How To Use Image Renditions
Image renditions are a feature in SharePoint that allows you to serve up different versions of images based on pre-defined image dimensions. This is especially important when there is user-generated image content or the image dimensions such as width and height are fixed by the CSS on the site. Even if an image is fixed by CSS, the full resolution image is still loaded. In this case the file size can be reduced by using image renditions.
There are two main ways to use SharePoint Image Renditions:
- Selecting the cropped version that will be shown in a webpart
- When adding an image to the page
Selecting the Cropped Version
We will be adding image renditions for more and more webparts. However, we are currently setting them for the following:
-
Homepage News Image - 960 x 540 pixels
(size did change)
-
Category/Content Tile Images - 1014 x 570 pixels
(size did change)
-
Dashboard Images - 262 x 174 pixels (no change in size)
-
Enterprise Image Tiles - 212 x 130 pixels (no change in size)
-
Custom News RSS (DEP) - 282 x 192 pixels (no change in size)
-
Accordion Images - 132 x 100 pixels
(no change in size)
-
Please note this is the chose accordion image in each list item not images within the content
- Slider Images
(no change in size)
- Summary - 75 x 75 pixels
- Simple - 225 x 150 pixels
- Homepage banner images - 1600 x 630 pixels (no change in size)
- Default Homepage Banner and Subsite Banner Images - 1600 x 340 pixels (no change in size)
- Blog (size did change)
- Blog Logo - 635 X 300
- Blog Header - 240 X 120
- Blog Article - 635 X 300
After following the steps for uploading an image, got to that image library and click the three dots when you hover over the image. Then click Edit Renditions.
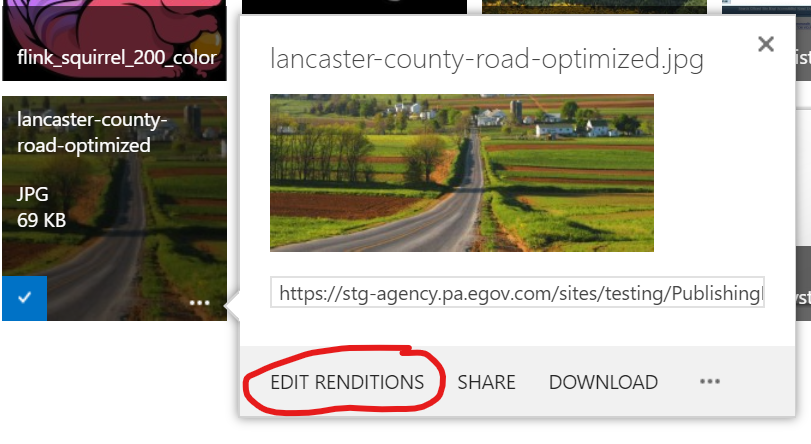
Here you are able to change the crop on your image, it will keep an aspect ratio but allow you to select what is seen.
- Just click the Click to change hyperlink for the version you want to set
- Select your crop version and click save.
- Click Ok at the bottom and it should update in a few on the authoring environment.
If you continue to follow the suggested sizes per each webpart / guideline there shouldn't be anything too much to crop.
Adding Images to the Page
After following the steps for uploading an image and selecting an image to add to a page, you can then select which rendition you would like to use.
- Highlight the image you uploaded, you should now see the image tab appear
- In the Image tab you will see Pick Renditions

- From the list you have a few options of different renditions to select, choose which one you would like (the first five are out of the box and the rest are related to specific webparts)
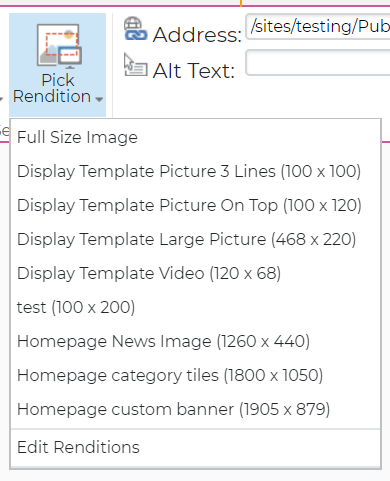
- This is not necessary to use, only if you find it helpful.